th8320u1008 install manual
The Honeywell TH8320U1008 is a state-of-the-art touchscreen programmable thermostat designed for efficient temperature control and seamless integration with smart home systems. Its intuitive interface and advanced features ensure optimal comfort and energy savings‚ making it a top choice for modern heating and cooling systems.
1.1 Overview of the TH8320U1008 Model
The Honeywell TH8320U1008 is a touchscreen programmable thermostat featuring an 8.8-inch blue backlit display‚ designed for precision temperature control. Part of the VisionPro 8000 series‚ it supports up to 3 heat and 2 cool stages‚ ensuring compatibility with various HVAC systems. The sleek‚ white design integrates seamlessly into modern home decor‚ while its advanced programming capabilities optimize energy efficiency. This model is ideal for homeowners seeking a user-friendly‚ high-performance thermostat that enhances comfort and reduces energy consumption. Its durable construction and intuitive interface make it a reliable choice for smart home integration and everyday use.
1.2 Key Features and Benefits
The Honeywell TH8320U1008 boasts an 8.8-inch blue backlit touchscreen‚ offering intuitive navigation and clear visibility. It supports up to 3 heat and 2 cool stages‚ ensuring compatibility with various HVAC systems. The thermostat features programmable scheduling‚ energy-saving modes‚ and automatic changeover between heating and cooling. Its smart recovery system optimizes temperature adjustment‚ reducing energy consumption. The device also supports voice control and integration with smart home systems for enhanced convenience. With a sleek design and user-friendly interface‚ this thermostat provides precise temperature control‚ energy efficiency‚ and seamless functionality‚ making it a versatile and reliable solution for modern homes.

Pre-Installation Requirements
Ensure the installer is a trained technician. Verify system compatibility and electrical requirements. Check for drafts or direct sunlight exposure to ensure accurate temperature sensing and regulation.
2.1 System Compatibility Check
Before installation‚ verify the Honeywell TH8320U1008 is compatible with your HVAC system. Ensure the thermostat supports your system type‚ whether it’s conventional‚ heat pump‚ or dual-fuel. Check the voltage requirements and wiring configuration to avoid mismatches. Refer to the installation manual for detailed specifications. Compatibility issues can lead to faulty operation or damage‚ so proper verification is crucial. Ensure the system’s electrical setup matches the thermostat’s requirements for a smooth installation process and optimal performance.
2.2 Safety Precautions Before Installation
Before starting the installation of the Honeywell TH8320U1008‚ ensure all safety precautions are followed. Disconnect power to the HVAC system to prevent electrical shock or damage. Verify that the installer is a trained‚ experienced technician‚ as improper installation can lead to hazardous conditions. Avoid installing the thermostat in areas exposed to drafts‚ moisture‚ or extreme temperatures‚ as this may affect performance. Do not install near flammable materials or in hazardous locations. Always follow the instructions in the installation manual and take necessary safety measures to protect both the system and the installer.

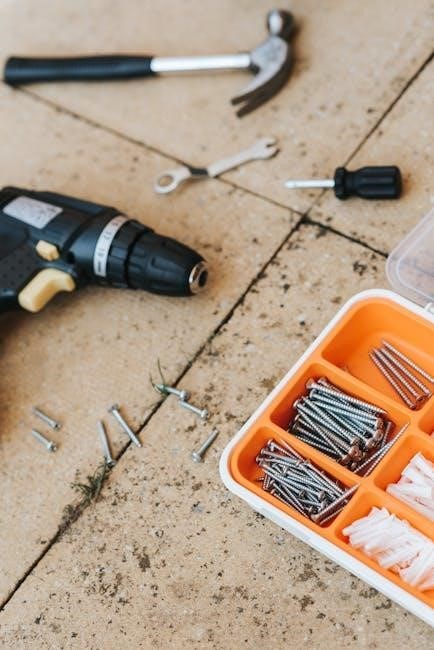
Tools and Materials Needed
Installers will need a 3/16-inch drill bit‚ screws‚ and wall anchors for mounting. The thermostat comes with a touchscreen interface‚ mounting hardware‚ and installation guide. Batteries are optional.
3.1 List of Required Tools
To install the Honeywell TH8320U1008 thermostat‚ you will need specific tools to ensure a smooth process. A 3/16-inch drill bit is essential for creating mounting holes. Screwdrivers (both Phillips and flathead) are necessary for securing the thermostat and connecting wires. Pliers may be needed for tightening connections‚ and wire strippers will prepare the wires for installation. A voltage tester is crucial to ensure power is off before starting work. Additionally‚ a level tool will help mount the thermostat straight‚ and wall anchors will secure it firmly. A pencil is handy for marking drill hole locations. These tools ensure proper installation.
3.2 Materials Provided with the Thermostat
The Honeywell TH8320U1008 thermostat comes with essential materials to facilitate installation. A wall plate is included to mount the thermostat securely. Screws and plastic wall anchors are provided for attaching the plate to the wall. A jumper wire is also included for systems requiring it. The package contains a user manual detailing installation steps‚ programming‚ and troubleshooting. Additionally‚ batteries are optional but recommended for backup power in case of an outage. These materials ensure a straightforward and efficient installation process‚ covering all necessary components for proper setup and operation of the thermostat.

Physical Installation Process
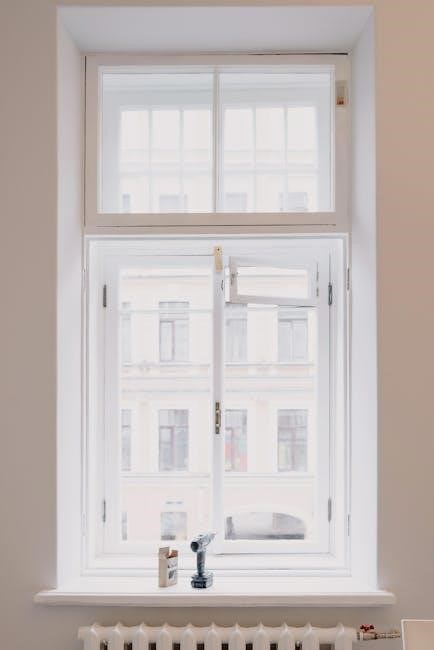
Begin by turning off power to the HVAC system; Remove the old thermostat and drill holes for the new mounting plate. Secure the plate‚ then install and tighten the thermostat. Ensure it is level and properly aligned for accurate temperature sensing and smooth operation.
4.1 Mounting the Thermostat
To mount the Honeywell TH8320U1008‚ start by switching off the HVAC system power. Remove the existing thermostat and assess the wall for any damage. Use the provided mounting plate and screws to secure it to the wall‚ ensuring it is level. Drill 3/16-inch holes if necessary for proper alignment. The thermostat should be installed at a height of approximately 5 feet for accurate temperature sensing. Tighten all screws firmly to prevent any movement. Ensure the surface is smooth and dry for optimal adhesion and functionality of the device.
4.2 Wiring Connections and Setup
Begin by disconnecting power to the HVAC system. Carefully remove the existing thermostat wires and label them for identification. Refer to the terminal labels on the Honeywell TH8320U1008‚ typically marked as R‚ W‚ Y‚ G‚ and C. Connect the wires to the corresponding terminals‚ ensuring secure connections. For two-transformer systems‚ remove the factory-installed jumper. If using batteries‚ install them now to provide backup power. Double-check all connections to avoid errors. Finally‚ restore power and test the system to ensure proper functionality. Follow the installation manual for specific wiring configurations and safety guidelines to prevent damage or hazardous conditions.

Configuring the Thermostat
Configure the thermostat by navigating the touchscreen interface to set up schedules‚ temperature preferences‚ and energy-saving modes. Ensure proper system operation by following the installation manual’s guidelines for initial setup and programming.
5.1 Initial Setup and Programming
Start by navigating the touchscreen interface to set up basic preferences. Set the time‚ date‚ and HVAC system type (heat/cool). Ensure location settings are correct‚ placing the thermostat about 5 ft above the floor to avoid drafts. Use the manual to guide initial programming‚ selecting options like temperature range and swing settings. After installation‚ disconnect power before beginning setup. Test system operation by running a cycle to ensure proper function. Follow the installation guide to configure energy-saving modes and custom schedules‚ optimizing comfort and efficiency. Proper setup ensures seamless integration with your home’s heating and cooling system. Always refer to the manual for specific instructions to avoid errors.
5.2 Setting Up the Touchscreen Interface
Begin by turning on the thermostat and following the on-screen prompts. Adjust the brightness and screen timeout settings for optimal visibility. Use the touchscreen to navigate through menus‚ selecting options like temperature units (°F or °C) and language preferences. Familiarize yourself with the interface‚ including the home screen‚ menu buttons‚ and navigation arrows. Ensure the thermostat is properly configured by reviewing and confirming location and system settings. The touchscreen is designed for intuitive control‚ allowing easy access to advanced features. Always refer to the manual for detailed guidance on customizing your interface for a seamless user experience.
Scheduling and Automation
Efficiently manage your heating and cooling system by creating custom schedules and enabling energy-saving modes. The thermostat allows programmable settings to optimize comfort and reduce energy consumption automatically.
6.1 Creating a Custom Schedule
Custom scheduling on the Honeywell TH8320U1008 allows users to tailor temperature settings to their daily routines. Program different schedules for weekdays‚ weekends‚ or specific periods. Use the touchscreen interface to set preferred temperatures for mornings‚ afternoons‚ evenings‚ and nights. The thermostat supports up to six distinct periods per day‚ ensuring precise control over heating and cooling. Energy-saving features automatically adjust temperatures during inactive periods‚ minimizing energy waste. This flexibility ensures comfort while optimizing energy efficiency‚ making it ideal for homeowners seeking a balance between convenience and cost savings.
6.2 Enabling Energy-Saving Modes

The Honeywell TH8320U1008 offers advanced energy-saving modes to optimize efficiency. Enable features like Smart Recovery‚ which learns your system’s operation to preheat or cool just in time. Use the touchscreen to activate energy-saving settings‚ such as lowering temperatures during sleep or when the house is unoccupied. The thermostat also supports geofencing and smart home integrations to automatically adjust temperatures based on your location. These modes help reduce energy consumption without sacrificing comfort‚ ensuring your system runs efficiently year-round while lowering utility bills.
Maintenance and Troubleshooting
Regular maintenance ensures efficiency and prevents issues. Troubleshoot common problems like temperature inaccuracies or screen malfunctions using the manual’s guidelines for optimal performance and quick resolutions.

7.1 Regular Maintenance Tips
Regular maintenance ensures the Honeywell TH8320U1008 thermostat operates efficiently. Clean the touchscreen regularly with a soft cloth to maintain responsiveness. Check and replace batteries promptly when the “LO BATT” warning appears‚ typically 30 days before depletion. Ensure the thermostat is mounted securely to avoid drafts or inaccurate temperature readings. Schedule annual checks of wiring connections to prevent loose contacts. Update software periodically for optimal performance. Refer to the manual for detailed maintenance schedules and procedures to keep your thermostat functioning at its best and extend its lifespan. Proper upkeep ensures consistent comfort and energy efficiency.
7.2 Common Issues and Solutions
Common issues with the Honeywell TH8320U1008 include display malfunctions or unresponsiveness. If the screen is unresponsive‚ restart the thermostat by disconnecting and reconnecting power. For “LO BATT” warnings‚ replace batteries promptly. If the thermostat fails to regulate temperature‚ check wiring connections and ensure they are secure. Incorrect system setup may cause heating or cooling issues; verify configuration settings. Consult the manual for troubleshooting steps and solutions. Addressing these issues promptly ensures consistent performance and maintains your comfort. Regular checks and timely resolutions help prevent major malfunctions and extend the thermostat’s lifespan. Always refer to the installation guide for detailed solutions.
The Honeywell TH8320U1008 thermostat ensures efficient temperature control and energy savings. After installation‚ verify all settings and functions for optimal performance; Consult additional resources for further assistance.
8.1 Final Checks and Verification
After installing the Honeywell TH8320U1008‚ perform a thorough system check. Ensure all wiring connections are secure and correctly labeled. Verify that the thermostat powers on and displays the home screen. Test heating and cooling modes to confirm proper operation. Check the touchscreen responsiveness and menu navigation. Review the programmed schedules to ensure they align with your preferences. Finally‚ confirm that energy-saving modes are enabled and functioning correctly. These final checks ensure the thermostat operates efficiently and meets your comfort expectations.